Wednesday, January 27, 2016

Badges for Professional Learning

At the recent TCEA Campus Technology Specialist Academy, I presented on “Promoting Technology Use on Your Campus.” During the presentation, I mentioned rewarding teachers who come to training by giving them a badge. The technology team at Lubbock ISD immediately stated, “Rewarding our staff with badges for completing staff development has really motivated them.” Focusing on positive motivation rather than a fear of negative consequences can really make a difference.
If you are looking for ways to motivate teachers to attend professional development, try incorporating badges. Below are a few resources for creating badges.
Badge Resources
  1. Class Badges Class Badges is one of the more popular badging platforms. Class badges allow the teacher to easily award badges aligned with learning goals.
  2. CredlyCredly allows teachers to create badges, upload their own designs, and give credit through the platform. It is available as a web-based version and an iOS app.
  3. Create a Badge with Google Drawing– If you have ever thought of creating your own badges, Google Drawing is a great tool to use. Read Alice Keeler’s blog entry on how easy it is to do.
  4. For All Badges For All Badges is an iOS app that works in conjunction with For All Rubrics to align your rubrics with badges. For All Badges also integrates with Mozilla’s Open Badges platform, and allows students (or staff members) to save badges to their “backpack.”
  5. Open Badges Open Badges allows teachers to create and issue badges that do not have to be tied to a certain platform. Take the Badges 101 Quiz to see how it works and to earn your first badge.
With badges, teachers who take the time to learn now have a way to be acknowledged for that learning. And we all know that recognition from our peers is the sweetest reward. Encourage them to include their badges in their email signature or print and post them in their classroom. You can even publicly honor them by “presenting” the badges at a faculty meeting.
Here is Lubbock ISD’s Digital Learning Badge site, a great resource. If you are incorporating badges into your professional development, I’d love to hear from you. Please let me know in the comment section below.

Friday, January 22, 2016

5 Fabulous Formative Assessments For Your Classroom


Teachers are constantly engaged in the process of formative assessment. Without the regular use of formative assessment, or checks for understanding, how are teachers to know what each student needs to be successful in the classroom? Teachers have many strategies and tools from which to choose. Learn about a few below.

Exit Tickets – Exit tickets can be a great way to set up the next day's learning.Before students leave class, they can be asked for an “exit ticket” that provides insight into what they learned from the day’s activities. For a digital exit ticket, try creating a Google Form that asks students about their thoughts on a lesson or have students create a short, three-panel comic strip outlining the day’s most valuable key idea.

Graphic Organizers – Graphic organizers can be used to assess prior knowledge, record learning during a lecture or class reading, or organize knowledge after learning. Some examples include Venn diagrams, word/idea webs or concept maps. Google Drawing, Gliffy, Bubbl.us, and Mindmeister are always great options for creating digital graphic organizers. For word clouds, try Wordle, WordIt Out or Word Mosaic.

Quick Write – With quick writes, you can ask student to respond to an open-ended question or prompt. This can be done before, during, or after the lesson. Some useful tools for this include Chatzy, Today’s Meet, and Padlet.  A few others to check out are Active Prompt and Lino. Don’t forget to remind students to share something unique and not repeat a classmate’s answer.

Quizzes Quizzes assess students for factual information and concepts. There is usually a single best answer and are great for on-the-fly assessment. Socrative can be used for quick quizzes as well as Kahoot, which lets you build fun into your quizzes.  Students can use computers, cell phones, or other devices to join in and answer the questions.

Recall – Recalling information allows students to list the most important concepts they learned or things that were meaningful to them. Try having students make a list – in words or simple phrases – and rank them in order of importance, like a Top Ten List. Try using List.ly or Listmoz to create digital lists.


Remember that the true value of doing formative assessments lies in what happens afterwards when you take the data and change your teaching strategies and processes to reflect what you’ve learned and to better serve each student.

Monday, January 18, 2016

Take Advantage of the Power of Google Forms for Perfect Rubrics

During a recent Google Educator Level I training, a participant asked, “Have you ever used a Google Form to create a rubric?” No one in the training, including myself, had ever used Google Forms this way.
We all agreed that rubrics are great for students. Rubrics clearly communicate what is expected of the student and they give students the opportunity to do a self-assessment to reflect on their learning process. In the past, I’ve had students evaluate their own and their peers’ performance using rubrics. What I particularly like about using rubrics is that they can be customized to suit any classroom activity. Had I created my rubrics in Google Forms, my life would have been so much easier.
Below are a few ways to create rubrics in Google Forms.


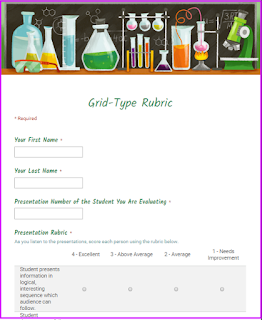
Use Grid-Type Questions

Using grids is typically how most rubrics are set up. When the user completes this type of rubric, he will be presented with a grid of rows and columns and will need to click a single cell to place his response for each row.
To create a grid-type rubric:
  1. Create a Google Form and enter a title.
  2. Type in your overall question, directions, or topic that will apply to each question in the grid (for example, Presentation Rubric).
  3. Then select the grid-type question.
  4. For the columns, enter your rubric scale. For example, 4 = Excellent.
  5. For the rows, enter your rubric criteria. For example, Student presents information in logical sequence.
  6. Once you click Done, you can preview your form.
Click here to see my rubric using a grid-type question.


Use Scale-Type Questions

Using scales in another way to set up your rubric. When the user completes this type of rubric, he will be presented with a scale of values on which to place his response.
To create a scale-type rubric:
  1. Create a Google Form and enter a title.
  2. Type in your overall question, criteria, or topic that will apply to the scale (for example, Organization).
  3. Enter help text, if needed, to help identify point values of the scale.
  4. Then select the scale-type question.
  5. Add your scale by entering a starting point (0 or 1) and an ending point (up to 10) for your scale.
  6. Next, add values for the starting point, such as Disorganized and add values for the ending point, such as Very Organized.
  7. Once you click Done, you can preview your form.
Click here to see my rubric using scale-type questions.


Other Items to Add to Your Form

Some other helpful items to add to your form at the beginning include:
  1. The name of the evaluator
  2. The class period
  3. A unique identifier (a code or number assigned to the student who is being evaluated)
Make these required questions by checking the box at the bottom of the question. That way, these questions won’t accidently be skipped.


Collecting Responses

As you most likely know, one of the beautiful features of Google Forms is that it automatically collects responses in a Google Sheet. Once all responses have been collected, you can then add formulas and sort the data in order to analyze it.
Now’s the time to stop using paper rubrics, like I once did. Try re-creating them in Google Forms. If you are already creating rubrics in Google Forms, I’d love to hear from you. Share your examples with me at diana.benner@gmail.com.